Raspberry Pi CM4 Carrier Boards from Gumstix

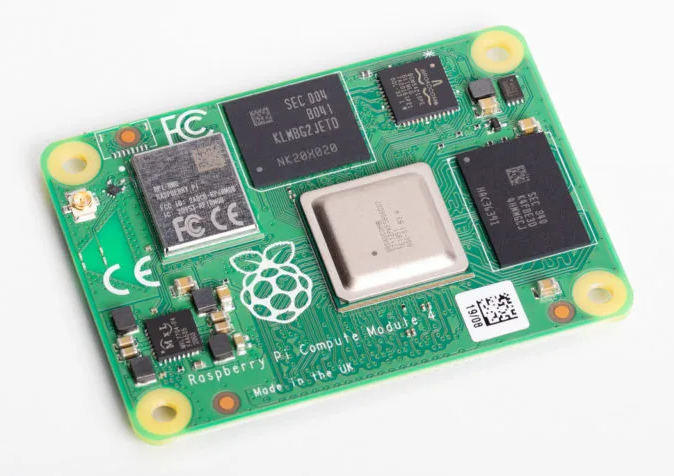
Your next embedded hardware platform won’t last long in the field without computing power, and Raspberry Pi has stepped up to the plate with the new CM4 computer-on-module (CoM). Raspberry Pi single-board computers, development boards, and CoMs have been massively popular in the embedded community. They’re great for developing embedded software and firmware for your peripherals, and they can easily take data from a range of devices over standard interfaces (UART, GPIO, etc.). There’s also plenty of community support for working with these dev kits.
The new Raspberry Pi CM4 has expanded the range of possible Pi-based applications, and a CM4 dev kit is the best way to get started developing a new application. If you want to develop a new application for your CM4-based system, you won’t get it deployed without a custom carrier board for your CM4. Here’s what you can do with a CM4 dev kit, how the CM4 module is different from a dev kit, and what it takes to design and manufacture a CM4 carrier board for your new product.
What Comes in a Raspberry Pi CM4 Dev Kit?
A Raspberry Pi CM4 dev kit is a complete hardware platform for developing embedded software and interfacing with a variety of external hardware modules. The CM4 dev kit you use should include access to all the built-in peripherals in a CM4 CoM. This lets you focus on developing your software for your CM4 board and firmware for your external modules, rather than worrying about the finer points of hardware design during development.
A CM4 module will attach to the dev board through the standard connector that would be used on a custom carrier board. This gives users access to all the standard peripherals on the CM4 module:
- GPIO, UART, and other standard interfaces
- DSI and HDMI interfaces connector for displays
- Google Edge TPU
- CSI interface for high-resolution camera connections
- Gigabit Ethernet for networking
- USB Type-A and USB micro ports
- Single lane PCIe, ideally through an M.2 (M Key) connector
Raspberry Pi CM4 On-board Features
In addition to these interfaces, you’ll have access to the other features built into the CM4 module. These include built-in Wifi and Bluetooth, up to 8 GB LPDDR4 RAM, and up to 32 GB eMMC Flash storage. This set of interfaces and on-board features on a CM4 module and dev kit makes the CM4 ideal for small NAS servers, sensor node controllers, smart home products, and edge computing products.

Interfacing with Other Modules
Before you build a custom board for your CM4 CoM, you’ll have to ensure the CM4 will be compatible with any external modules you want on your carrier board. The best dev kit should include a pin header for accessing low-speed interfaces (SPI/UART/I2C/SDIO), keyed connectors for the PCIe lane, and even coaxial connectors for interfacing with RF equipment. You can connect development boards for other critical components through these connectors and standard interfaces.
Once you’ve built out your embedded software for your CM4 application, you can move on to designing a custom carrier board for your CM4 CoM. This last step in the development process is one of the most important for deploying your CM4-enabled embedded product.
Design Your Own CM4 Board with Upverter
If you want to develop your carrier board for the Raspberry Pi CM4, you don’t need to be a PCB design expert. Upverter is an online design platform that lets you quickly design a carrier board for a CM4 CoM and put it directly into manufacturing. When you’re building your CM4 carrier board in Upverter, you can add a number of connectors and peripherals to the board without worrying about complex PCB layout tasks. Some modules you can add to your board include:
- GPS/GNSS modules, a LoRaWAN transceiver, and other radio modules
- High-resolution cameras through vertical and ribbon connectors
- SD expansion cards for extra memory
- Google Edge TPU designed to run inference at the edge
- Pin headers, terminal blocks, and other board-to-board connectors
The drag-and-drop interface lets you take a modular block design approach to CM4 carrier boards using proven hardware modules. Best of all, these tools are accessible in your browser; there’s nothing to download or install, and you can import your design files into your PCB design software as needed.

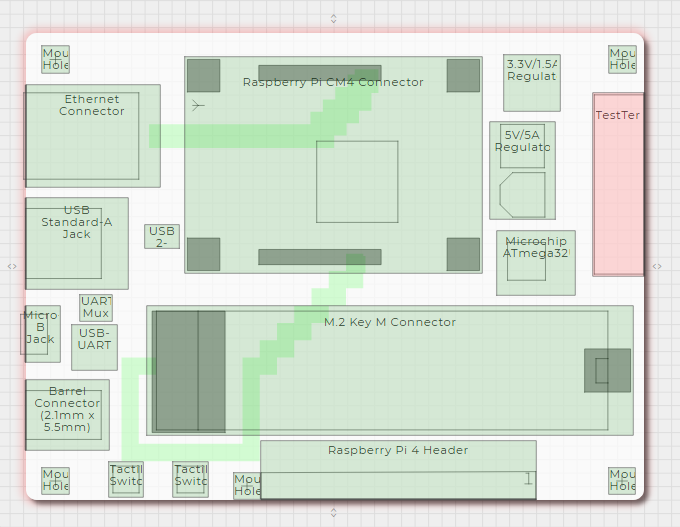
The image above shows a modified version of the Gumstix Raspberry Pi CM4 development board. You can start your custom design from a CM4 development board template. The standard pin header and display interfaces have been removed, a test terminal has been added for rugged connections to external boards, and the board size has been slightly reduced. These types of modifications can be easily added without worrying about layout and routing in PCB design programs, and a design can be quickly put into manufacturing and assembly within Upverter.
Eventually, you’ll need to move away from a Raspberry Pi CM4 dev kit and start working with a proprietary hardware platform. If you aren’t a professional PCB designer, Upverter gives you the tools you need to quickly create a custom carrier board for your next embedded application. You’ll have access to a CM4 board and other industry-standard COMs and popular modules in a drag-and-drop browser interface. The next time you need to quickly create a new carrier board and place it into production, try using the modular electronics design tools in Upverter.
Take a look at all of the Gumstix Raspberry Pi boards or contact us today to learn more about our products, design tools, and services.
